


Getting Started with NodeBalancers
Traducciones al EspañolEstamos traduciendo nuestros guías y tutoriales al Español. Es posible que usted esté viendo una traducción generada automáticamente. Estamos trabajando con traductores profesionales para verificar las traducciones de nuestro sitio web. Este proyecto es un trabajo en curso.
Nearly all applications that are built using Linodes can benefit from load balancing, and load balancing itself is the key to expanding an application to larger numbers of users. Linode provides NodeBalancers, which can ease the deployment and administration of a load balancer.
This guide provides a high-level overview setting up a NodeBalancer, but it’s outside this page’s scope to explain each application a NodeBalancer could balance. For more information on various applications that might be useful behind NodeBalancer, see the rest of Linode Guides & Tutorials on NodeBalancers.
Before You Begin
This tutorial assumes a basic understanding of load balancing and NodeBalancers. We recommend reviewing the following guides:
To properly configure a NodeBalancer, you must have at least two Linode Compute Instances within the same data center. Both of these servers must also have private IPv4 addresses. See Managing IP Addresses.
Configuring a NodeBalancer
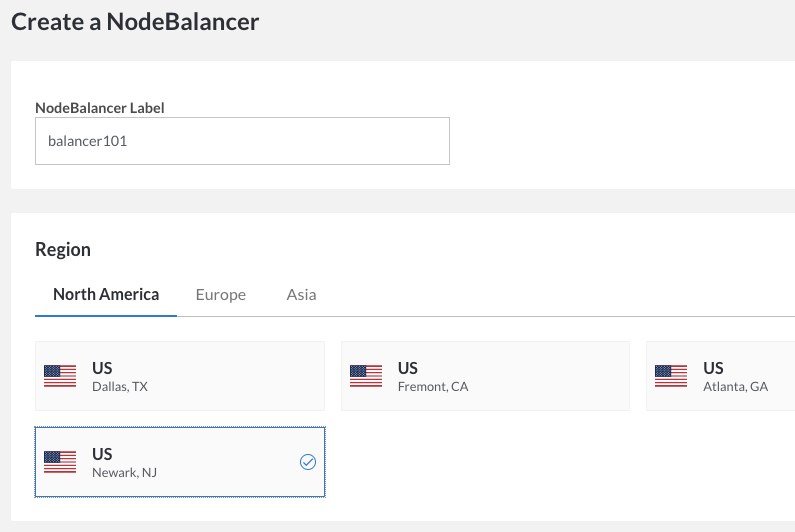
Visit the NodeBalancers page in the Linode Cloud Manager and select Add a NodeBalancer.
For the example web application, only one NodeBalancer is needed. Add one in the same data center that your backend Linodes are located in.


A NodeBalancer is configured using ports, and in this example web application, you’ll use only one, port 80 for regular HTTP traffic.

HTTP
For the traditional web application, the settings in the screenshot above are a good start. HTTP cookie stickiness is preferred so that the same client will always land on the same backend – for a simple web application that keeps sessions in memory, this is necessary to avoid session errors on clients.
HTTPS
If you select the HTTPS protocol, two new fields will appear where you can add your SSL certificate, chained certificates (if applicable) and a private key (which must not have passphrase protection).
Every ten seconds, the NodeBalancer will request the root of the web application and look for a valid response code. With this example setup, there is only one backend node (which you will add shortly); if the backend goes down, the NodeBalancer will serve a plain 503 Service Unavailable error page. This is more desirable than refusing connections or making browsers wait for a timeout.
Note
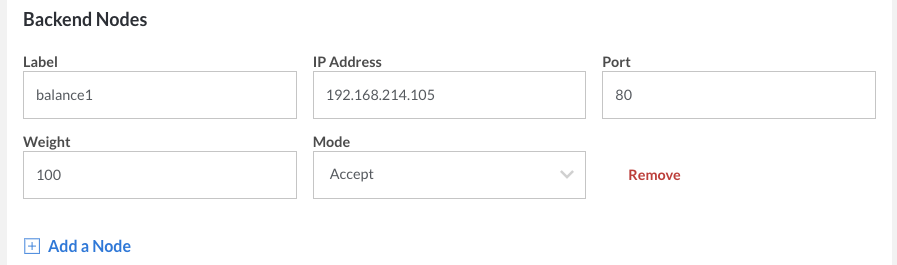
The port you select for the NodeBalancer must match the port you are going to use on the backend Linode(s) in the next step. For example, if you are going to be receiving only regular HTTP traffic, it’s common to use port80. The NodeBalancer SSL Configuration guide will show you how to redirect port443, HTTPS traffic, to port80for SSL certificates.Now you will add the single backend node to the NodeBalancer’s configuration. Point this at the private IP address of your web server Linode.


These configuration changes will take a few moments to be reflected by your NodeBalancer. If everything is configured on your backend correctly, once the changes have gone through, the Node Status column will update to 1 up / 0 down.


If the backend status reports 0 up / 1 down, check to make sure that your web application is configured to respond on the Linode’s private IP address. You do this by adding the private IP address to your
/etc/hostsfile on your Linode and then reboot your Linode. There might be a virtual host mismatch as well – check the notes in the next section.Now that the backend is up, go directly to your NodeBalancer’s IP address in a browser. You should see your web application as the NodeBalancer proxies the traffic through.


A Note about Virtual Hosts
You might not see the web application that you expect when you go directly to the NodeBalancer’s IP address. This is due to virtual hosts, and is not an issue unique to NodeBalancers. In the default configurations of many web servers, an application might only be configured to respond for certain hostnames. This can impact testing NodeBalancers as well as the behavior of their health checks.
It is important to configure the “default” virtual host in your web server to point at something useful. The NodeBalancer will pass the Host header from a browser untouched, so virtual hosts will work entirely normally once you are pointing a domain at the NodeBalancer. It is only mentioned here because testing NodeBalancers can demonstrate quirks in a web server’s configuration, particularly when browsing by the NodeBalancer’s IP address.
NoteHealth checks are transmitted with a Host header (in HTTP/1.0 mode).
Putting the NodeBalancer in Charge
Your NodeBalancer is now working and is able to pass traffic to your web application. It is important to note at this point that configuring the NodeBalancer has not impacted your application’s normal operations at all – you can test the NodeBalancer without your users ever knowing.
Once you are satisfied that NodeBalancer is working normally, you can switch your web application’s traffic over to it through DNS.
On the NodeBalancer’s overview, you can see its IP address. Take note of the IP address, to use in the A record for your domain.
Edit or create an A record for your website’s domain name, pointing to your NodeBalancer’s IP address.

Also add an AAAA record for the IPv6 address.

Once the DNS changes propagate, traffic will begin flowing through the NodeBalancer. At this point, you will want to wait up to 24 hours for all caches to catch up to the NodeBalancer before proceeding.
Additional Backends and Features
On another Linode, make an exact copy of your current web server. The Linode Backups service can be instrumental for doing so, as a snapshot can be restored to any other Linode. Once you have another backend ready, simply repeat step four of Configuring a NodeBalancer to add it to the NodeBalancer configuration.

Once the configuration is sent to the backend, users will be balanced over the two Linodes and each will be monitored for health. This configuration is easy to work with, as upgrades can be rolled out to each backend without disrupting service and backend Linodes can be taken in and out of rotation at will.
This is just the beginning; NodeBalancers are extremely flexible and cater to a lot of needs. From here, the API can be used to add many backends. Multiple ports on one backend can be balanced for complex setups. Additionally, new tools like memcached can be introduced to the application to allow session stickiness to become irrelevant.
Limitations
Nodebalancers have a maximum connection limit of 10,000 concurrent connections.
This page was originally published on